
# Episodes
This is where you create episodes as well as episodic shots in those episodes.
# How to create episodes
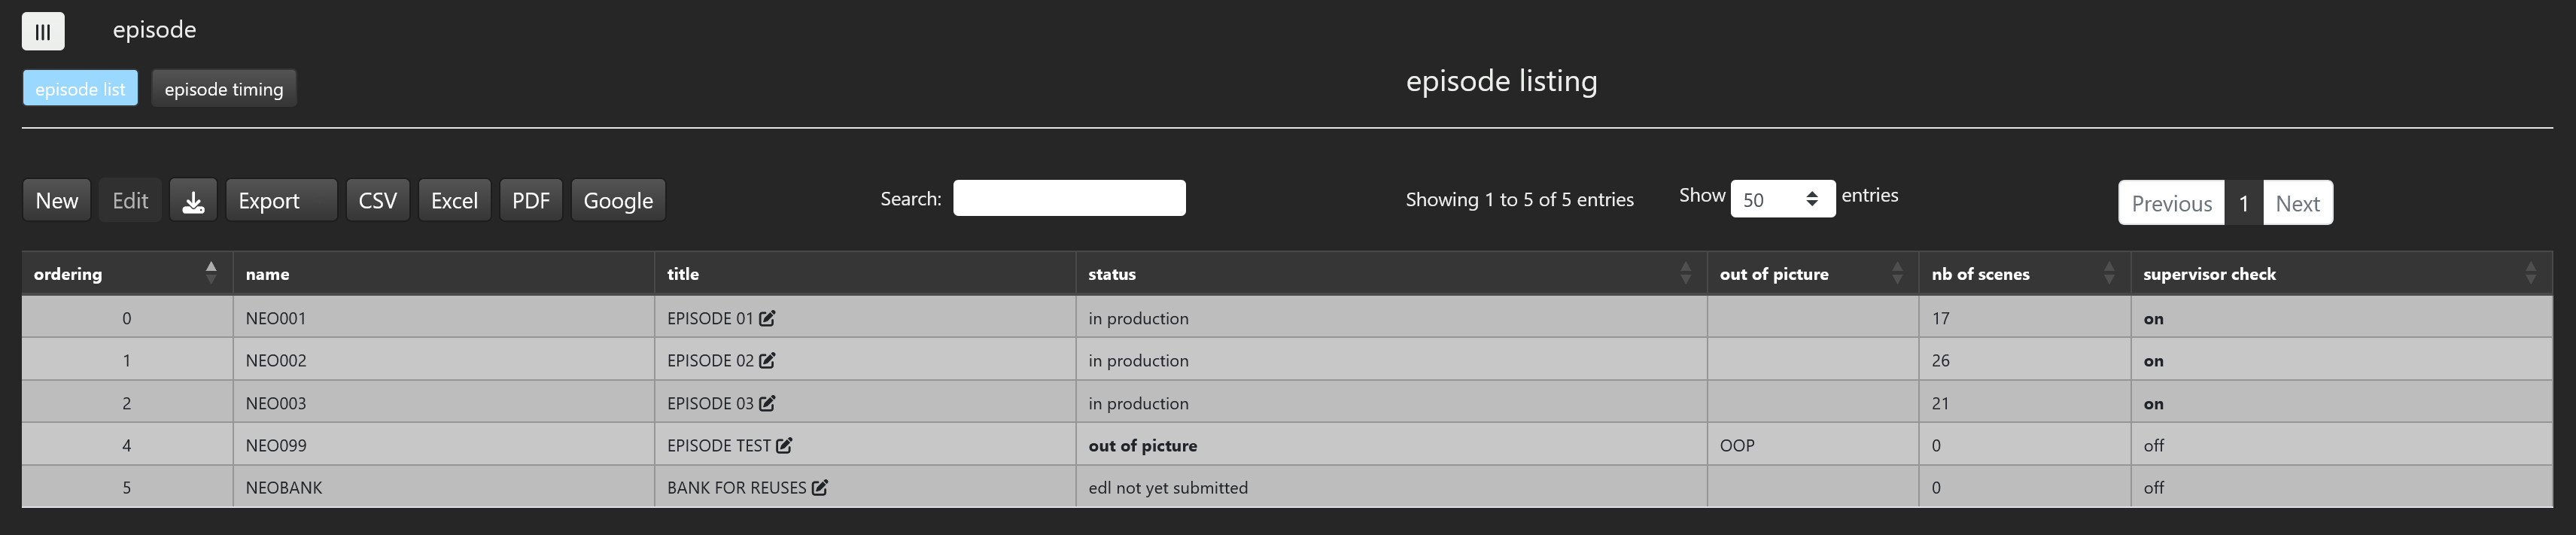
The episode listing page displays all the episodes of the project. This is also where you create episodes.
The episode list may be exported in various format (csv, excel, pdf, google spreadsheet...) by clicking on the corresponding button.
Episodes can either be created one by one or in batch mode through the importation of a csv file containing a list of episodes.

The New button creates an episode, the download icon prompts you for a csv file.
# Creation of an episode
The episode creation menu will be displayed upon clicking on the New button.
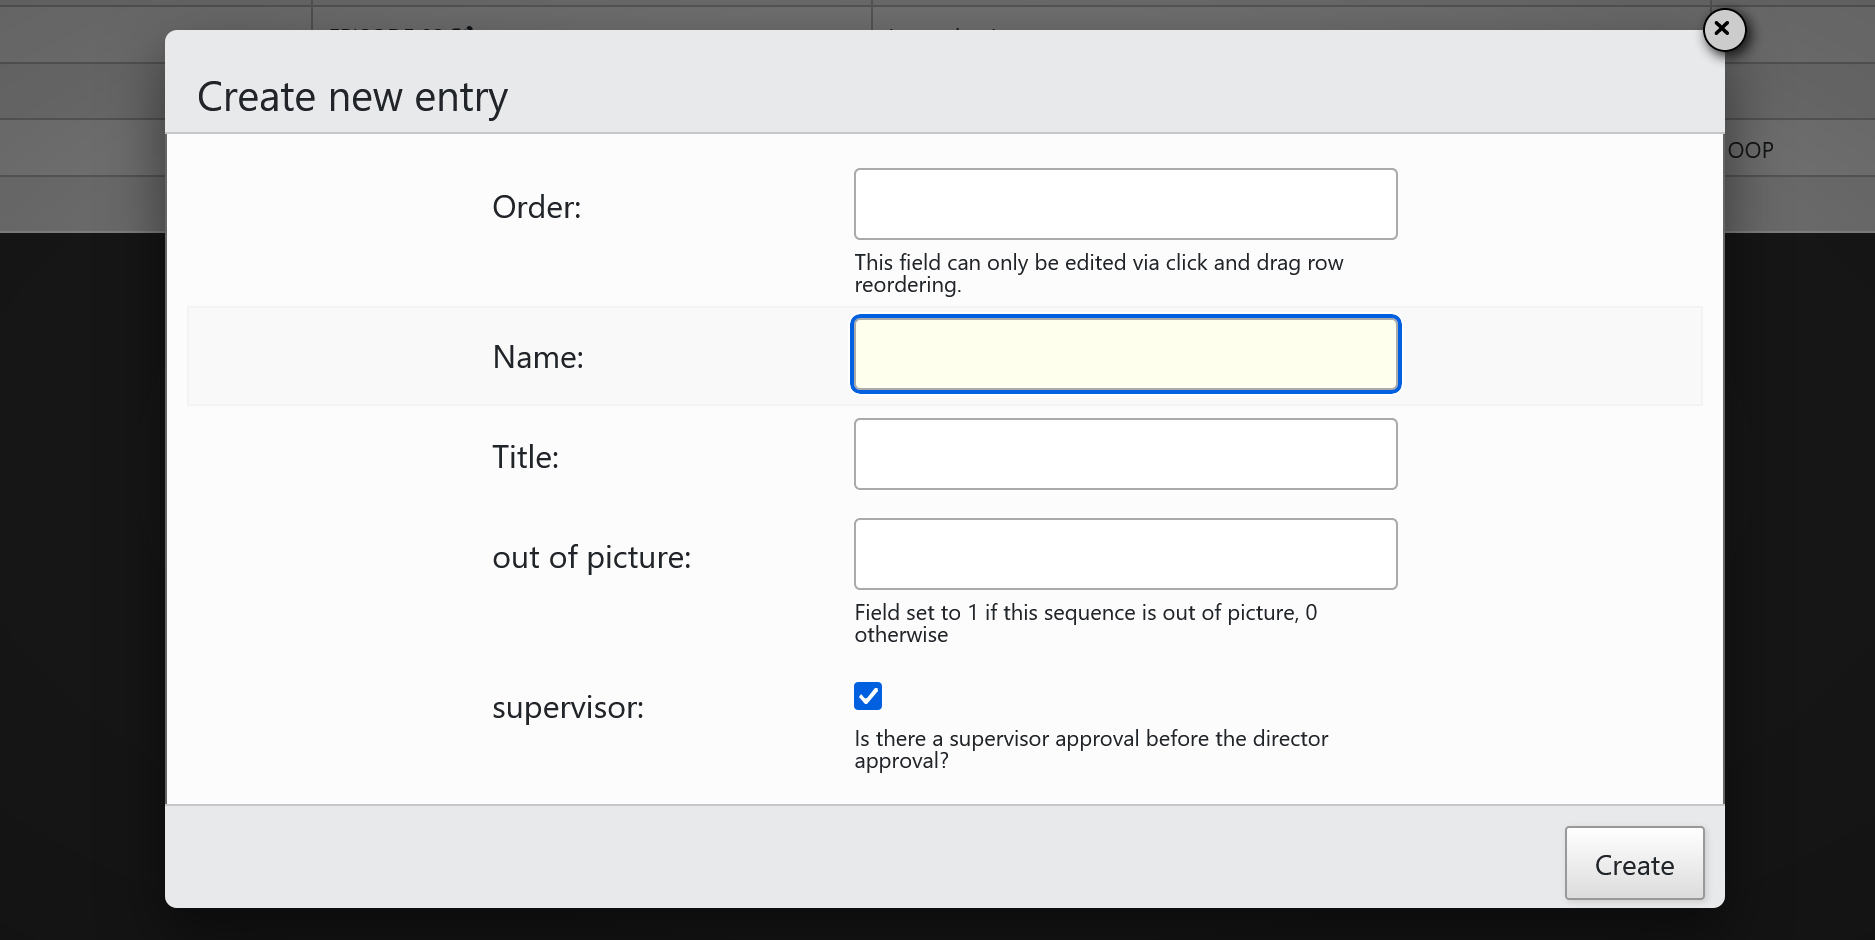
Fill the episode name field and the episode title field. For a creation, the Out Of Picture field should be set to 0. The order field indicates in which order the episodes are displayed in the list of episodes or in the episode pull down menus all over the SPI user interface. This field will be automatically set through click and drag row reordering, hence there is no need to set it when creating an episode. If you want to have a supervisor approval before the director approval anywhere in this episode, just check the supervisor checkbox.
When you click Enter, your episode will appear in the episode list. In the ordering column of any episode, you may now click and drag this episode to place it wherever you want in the list of episodes. You can also edit the episode title straight from the list. Clicking on the name column of an episode will display the main viewer page for this episode. Clicking on any other columns will select the episode for later editing.
WARNING
When you just created an episode, the very first thing to do is to set up the organisation rights for this new episode. The organisation rights will define the rights to view and to access this episode per organisation.
# Creation of several episodes
Importing a csv file will allow you to create several episodes at once. The format of the csv file must follow the following structure:

In the name column, the project prefix should precede the episode number (in the second row, NEO is the project prefix and 007 the episode number). The project prefix is defined in the projects section.
TIP
Do not forget to setup the organisation rights after you created episodes.
# How to create episodic shots
To create episodic shots, you first have to select an episode in the episode pull down menu of the timing section. In the example below, episode NEO007 has been selected. The episode status field (Not Started|No reel available ) indicates that no edls have been yet uploaded for this episode. The workflow pulldown menu defines the workflow that will be followed by newly created scenes.

Once the episode has been selected, you have to upload:
- First an edl (edit decision list)
- Then a video file also called animatic
and then launch the preparation of the episode which will cut the video file according to the edl thus creating episodic shots.
# Format of the edl
The format of the edl can be:
- Either a text file with the .txt extension
- Or a csv file with the .csv extension usually coming from ToonBoom Storyboard Pro
- Or a CMX 3600 file with the .edl extension coming from Premiere Pro or Final Cut Pro
The text file must follow the following structure:

It consists of four columns separated with the tabulation charater. The first column is the sequence name, the second column is the scene name, the third column is the start frame in the video whereas the fourth column is the stop frame in the video. NONE should be used in the sequence column if you do not want to use sequences.
The csv file coming from TBSB Pro follows the following structure:

The column labelled "ObjectId"; "SceneName"; "PanelName";"Transition";"SceneFrames"; "PanelFrames" are compulsory, all other columns are optional. Make sure you check those columns when you do an export from TBSB Pro.
The CMX 3600 file just follows the industry standard EDL specifications. (opens new window) The reel names in this file are extracted along with the frame in and the frame out to specify all the episodic shots.
Once the edl has been successfully uploaded, the episodic shots of the selected edl are displayed below the list of edls. In the below example, only one edl has been uploade for episode NEO007.
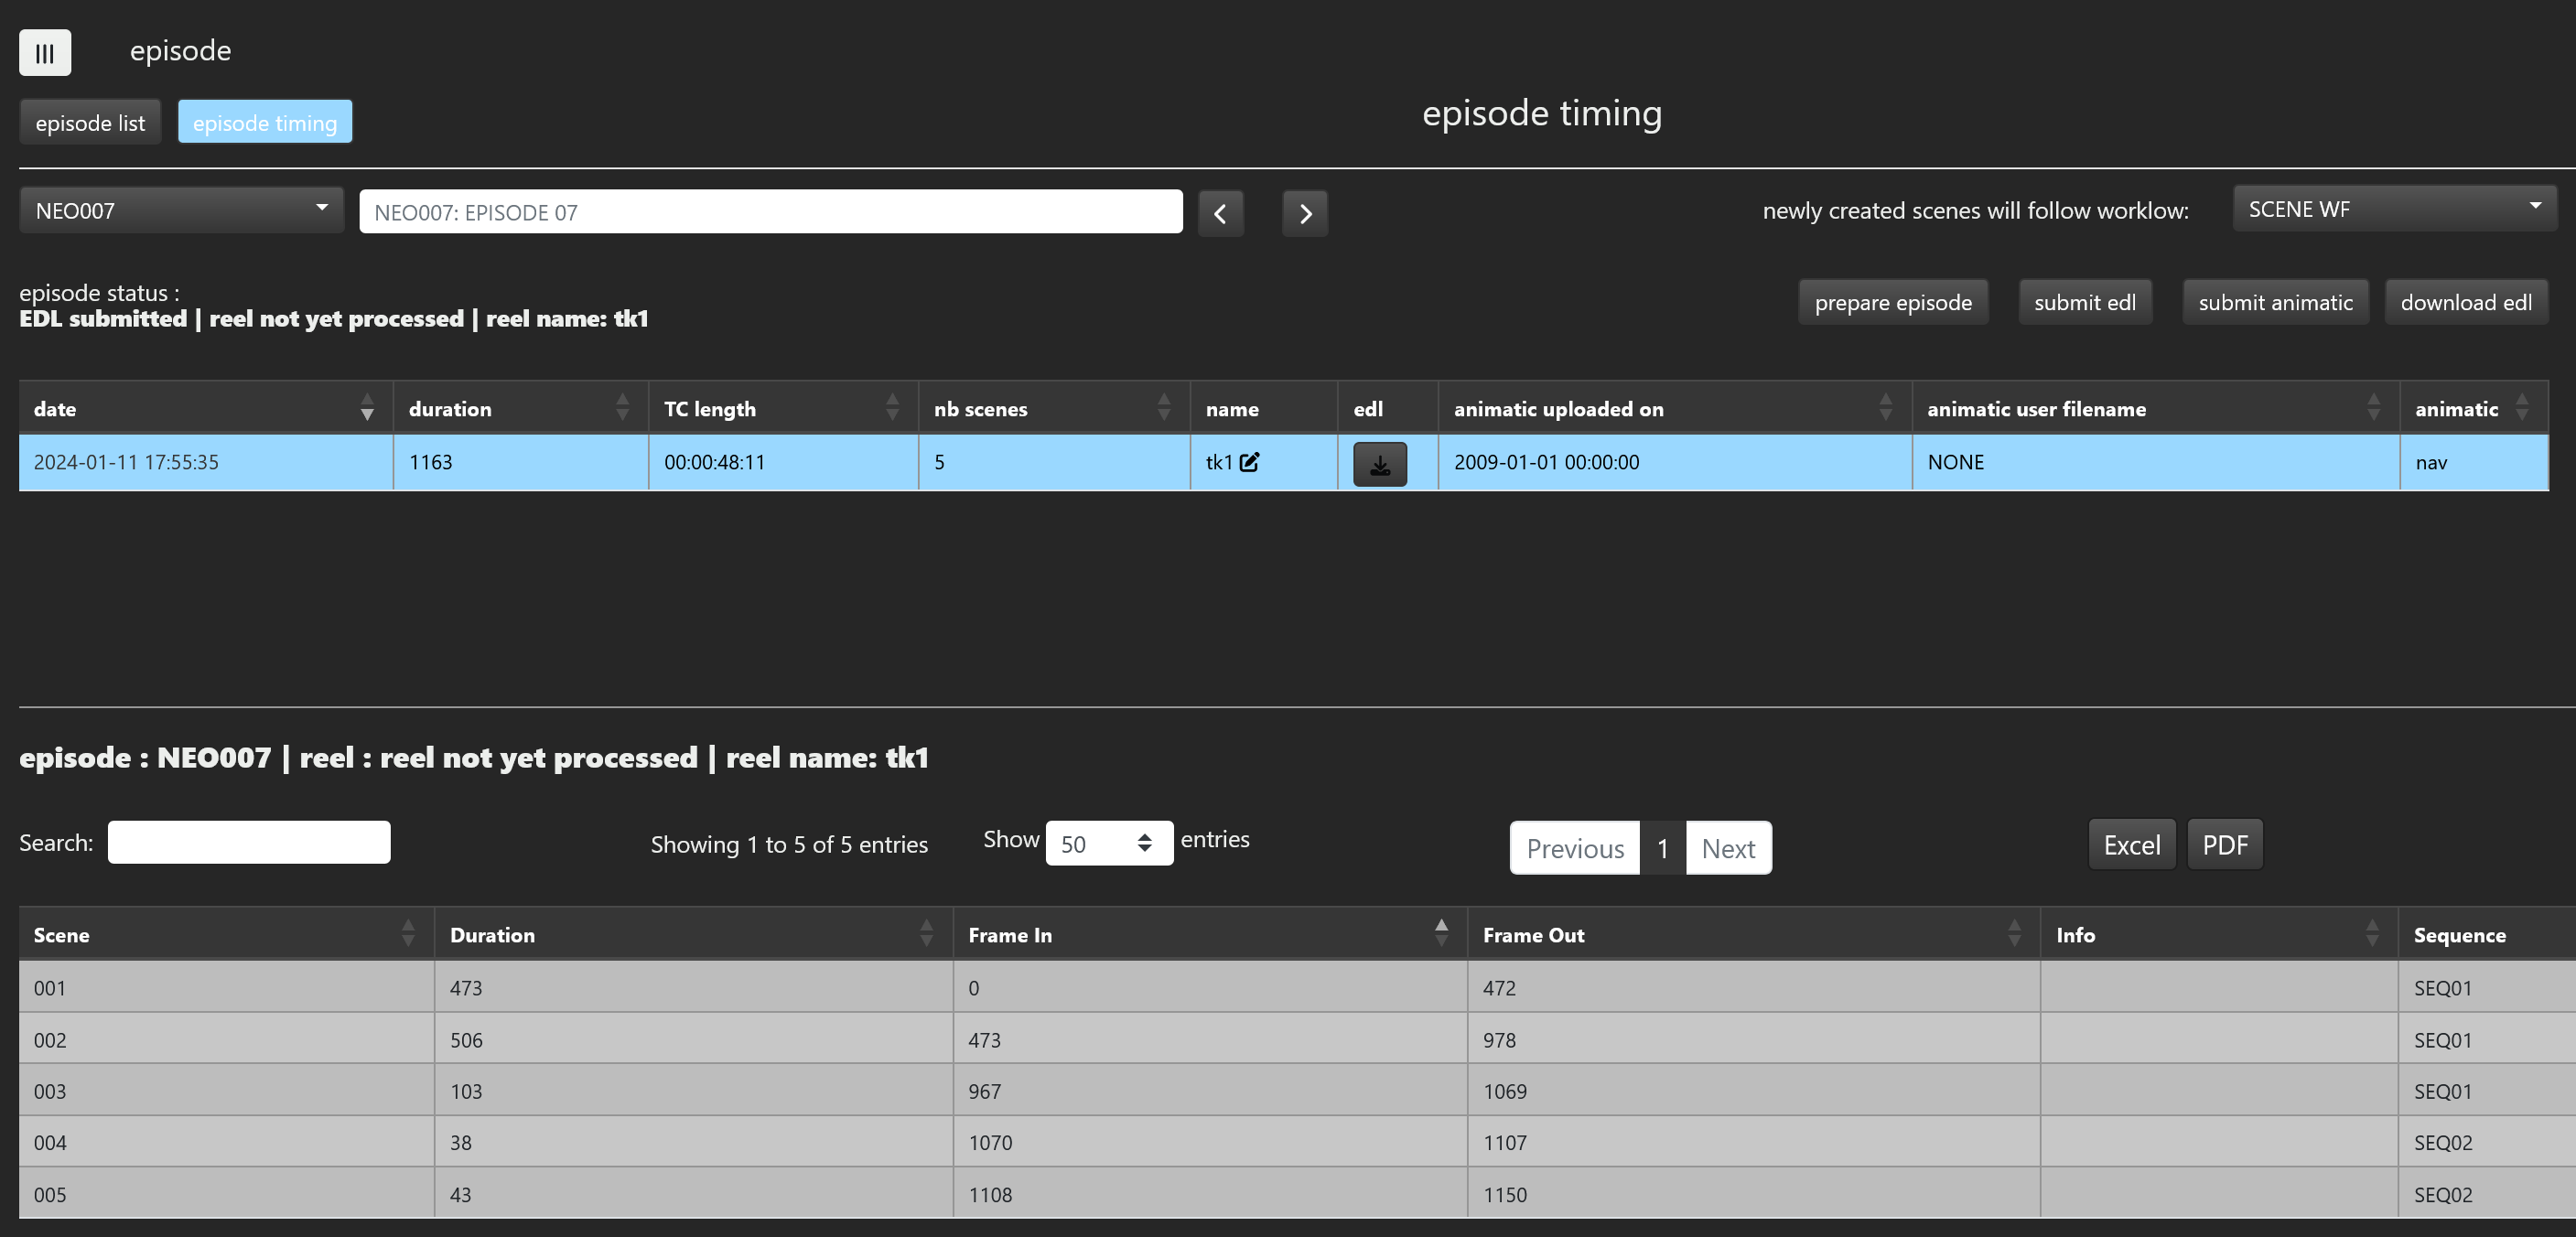
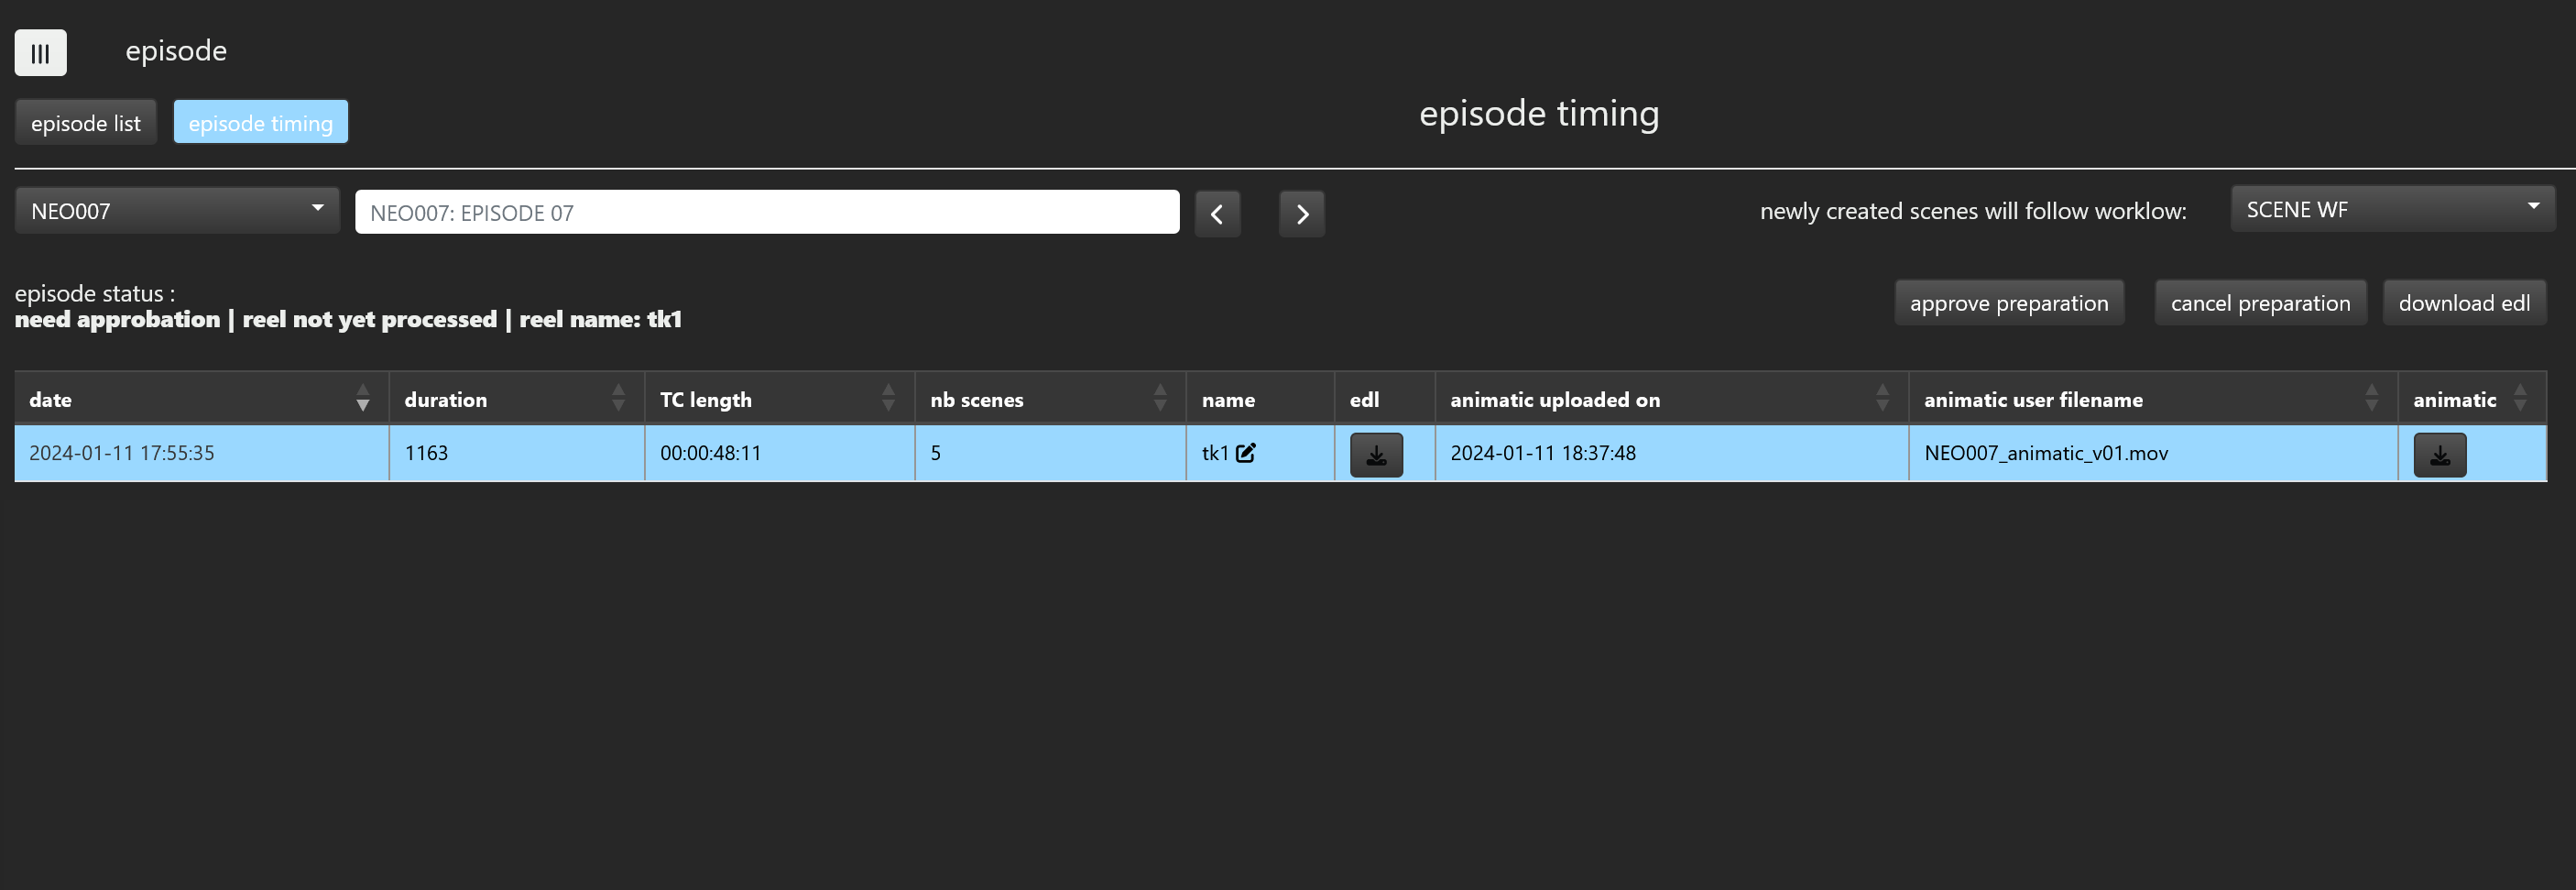
You then can upload the animatic with the submit animatic button. In the example below, the file NEO007_animatic_v01.mov has been uploaded.

You now can launch the preparation of your episode with the prepare episode button. This process will simply cut the animatic file previously uploaded
from the first frame to the last frame for all the episodic shots of the edl. The resulting videos will be placed at the animatic step for all the episodic
shots comprised in the edl.
WARNING
Note that cutting a 11 minuts episode comprised of 200 shots might take several minuts. This CPU intensive task runs as a background process
and an email will be sent to you upon completion. The processing... button indicates that the preparation is still running.
Once preparation is finished, you may either approve it or cancel it with the approve preparation and cancel preparation
buttons.
It is very important at this stage to check that your preparation did cut the animatic the way you expected. To do so, go to the
viewer, select the episode and the animatic step and check that your shots were indeed
properly cut. If this is the case, you can click on the approve preparationbutton, your episode will now be fully prepared and ready to receive elements according
to the workflow used. Otherwise, you can hit the cancel preparation, find out where the problem is, and reload an edl and/or an animatic.
# How to change the timing of an episode
SPI allows you to change the timing of an episode at any given time in the the making of your project. To do so, you just have to upload:
- A new edl
- And a new animatic video file
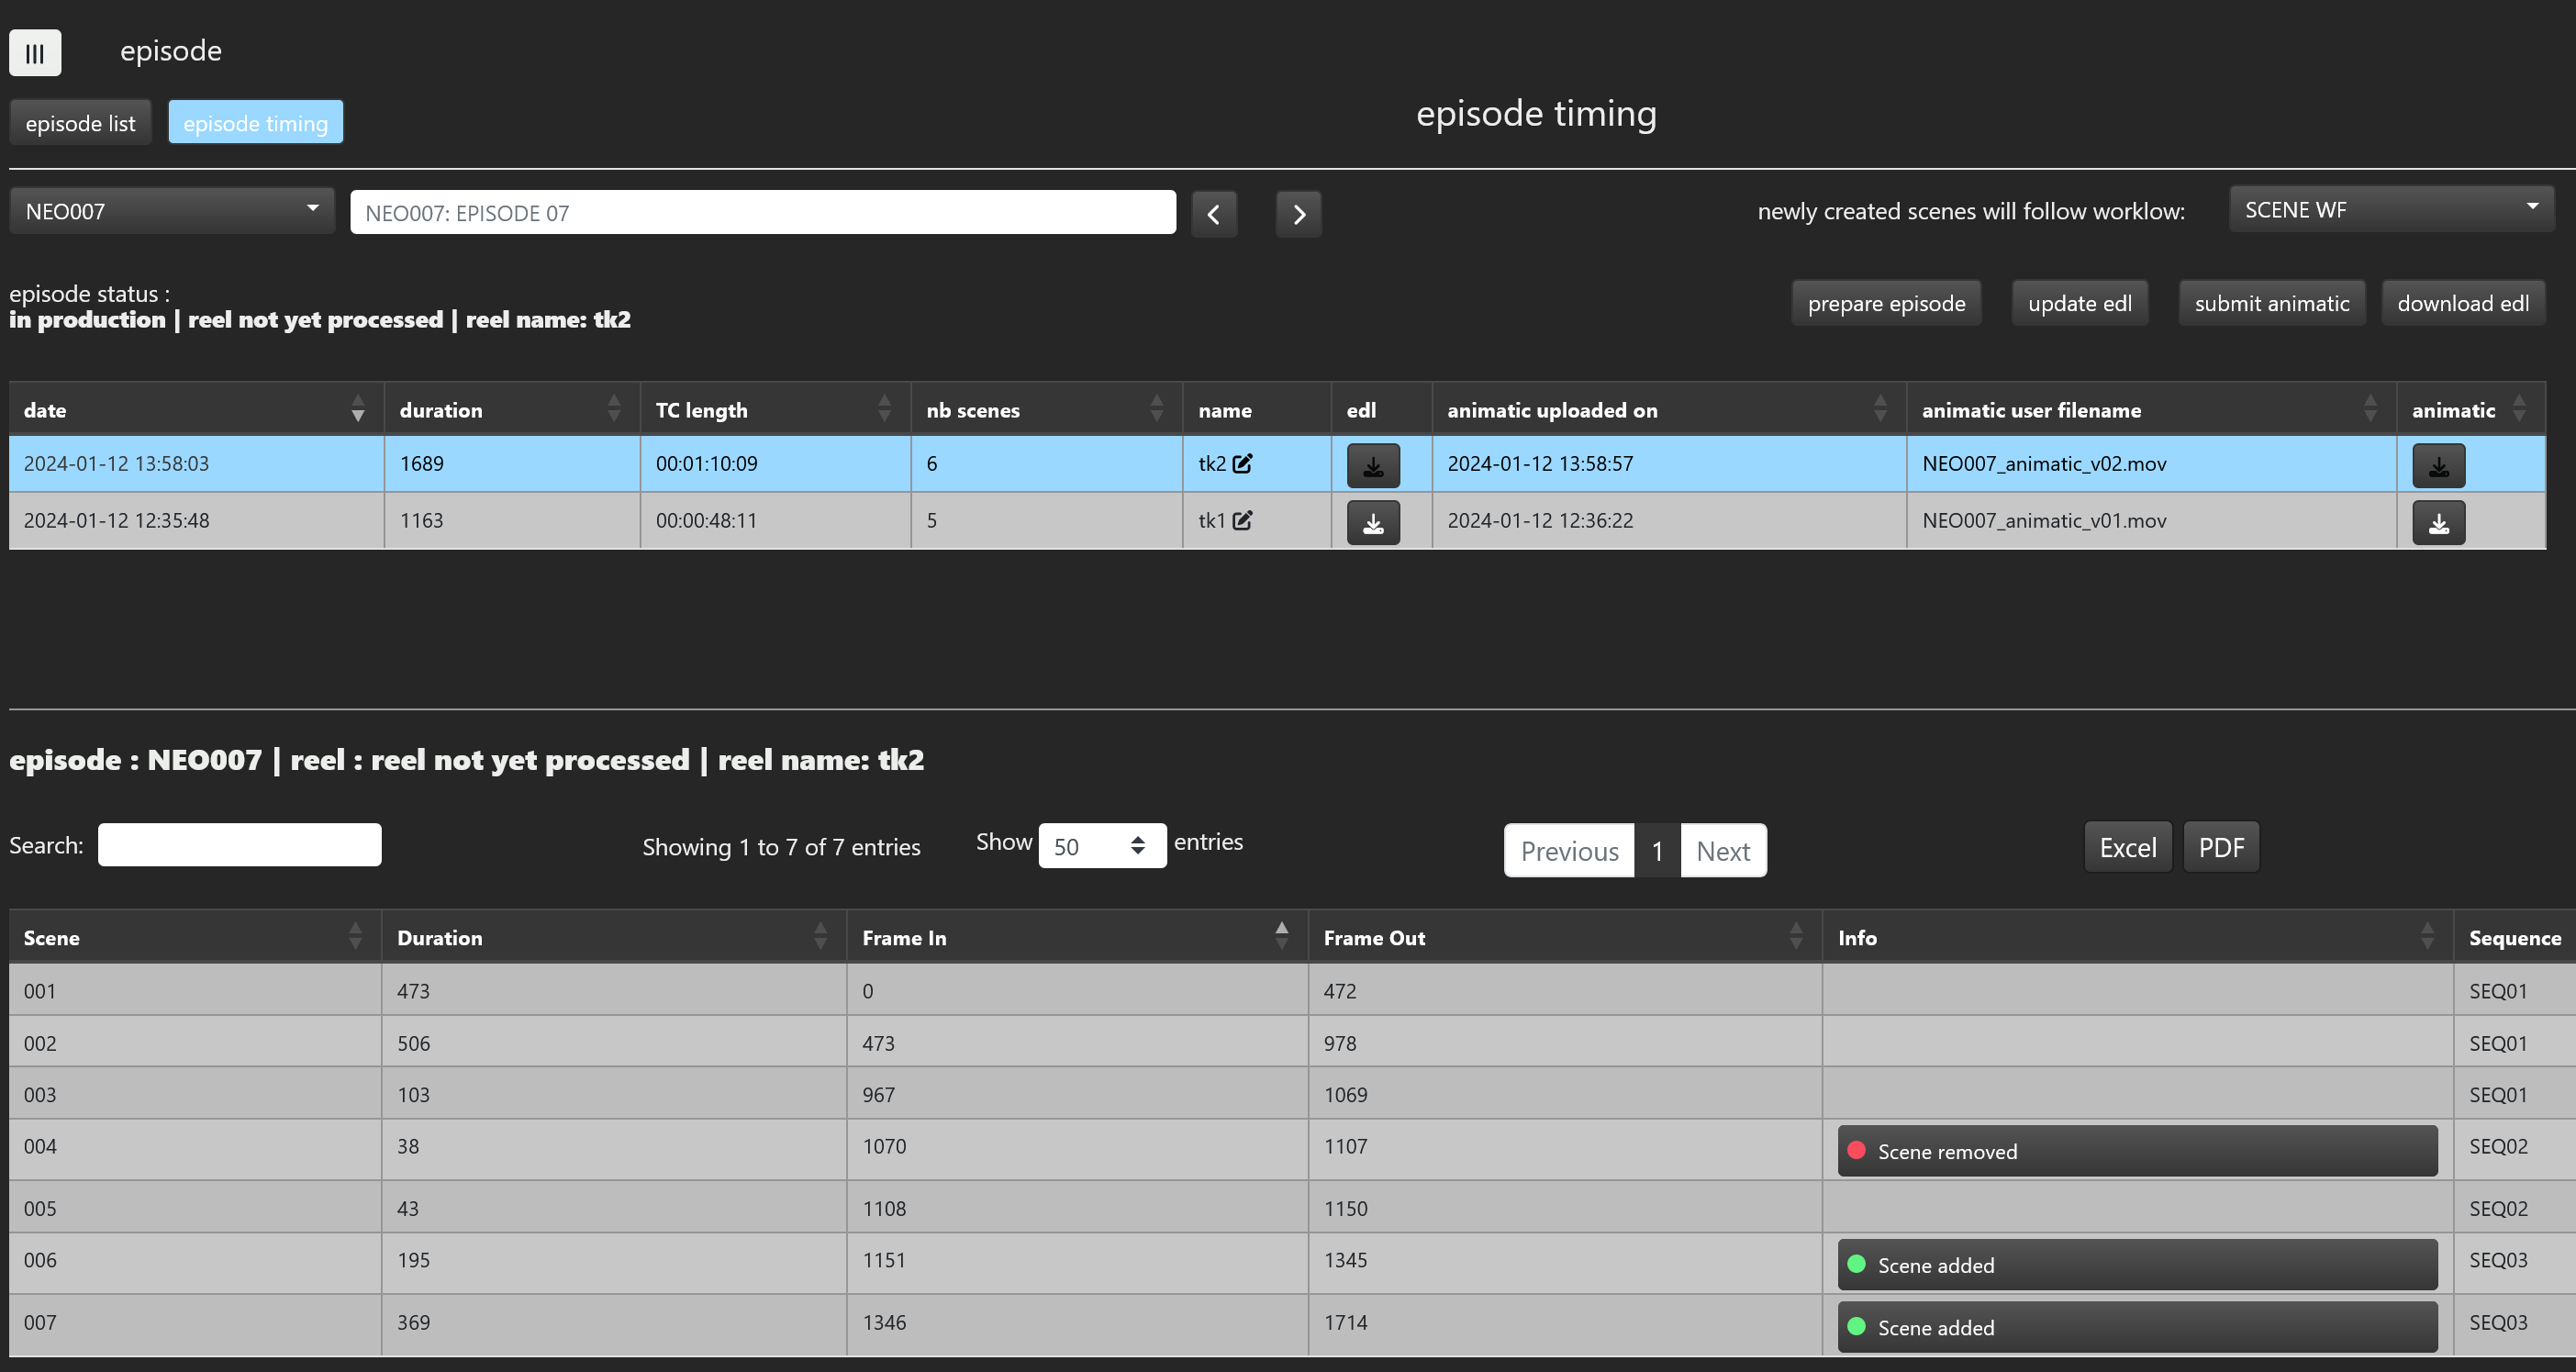
In the example below, we modified the edl of our episode NEO007:
- by removing scene 004
- by adding two additional scenes 006 and 007

After the upload of your new edl and animatic, SPI will show you the differences between the current reel and the previous one:
If you hit the prepare episode button, a new take of your animatic cut according to the new edl will be available for your episode.
← Assets Breakdown list →